for the newbies in Logons skinning...
Creating a Bitmap_128
This tutorial is made to help understand how transparency and per pixel alpha blending is applied in bitmap_128 using Adobe Photoshop. To illustrate this, we will be using the bitmap_128 used in the Windows Vista Logon version 1.2 which can be downloaded here Link . Remember that in alpha channels or layers, black means transparent and white means solid. Any color between white and black would be semi-transparency of different levels.
1. First, create a new document with sufficient dimensions to hold all logon elements to be contained in the center panel. The commonly used dimension is 612 x 501. The background could either be white or any color or even transparent depending on your discretion.
2. Create a new layer and name it “Glass”. Press U to activate the shape tool . Choose the round rectangle tool and set it to 20px radius . Set your foreground to white and then draw your shape to the size you like onto the document.
3. Ctrl+click on the thumbnail of your “Glass” layer on the layers tab to make a selection exactly like the shape you just created. Go to the channels tab and create a new channel (its default name will be Alpha 1) .
4. To create a subtle shadow effect around your glass, set your foreground color to #636363. Press ctrl+alt+d to open feather selection window, set feather to 3 and press enter.
5. On your “Alpha 1” channel, press alt+backspace to fill the selection with the foreground color. Press ctrl+d to deselect.
6. to create that semi-transparent outline of the glass, go back to the layers tab and ctrl+click on the thumbnail of your “Glass” layer to select it. Return to channels tab, set your foreground this time to #c8c8c8. Press alt+backspace to fill the selection with the foreground color.
7. With your selection still on, go the Select menu, click modify, choose contract and set it to 1. Press ok.
8. Set your foreground color to #484848 and your background color to #282828. Press G to activate your gradient tool. Set gradient filling to Reflected Gradient and apply it on the image like here. Press ctrl+d to deselect.
That basically covers the main steps in creating transparent, per-pixel blended, glass-like bitmap_128. If you want to add more objects into the image, you can do so. Just go back to the layers tab and add your stuff there. But make sure that in your alpha channel, you specify whether these will have solid colors or semi-transparencies. To continue
9. In the Vista logon, notice the solid colors of the logo. It also has shadows. To accomplish that, you have to make another layer for the logo. Then Ctrl+click on its thumbnail to select it.
10. Go to the alpha channel and follow procedure #4.move your selection 4pixels left and 4 pixels down. Press alt+backspace. You will get something like this.
11. Now, go back to the layers tab and reselect the "logo" by control clicking on its thumbnail. Again return to the alpha channel; this time set the foreground to white. Press alt+backspace to fill the selection with white.
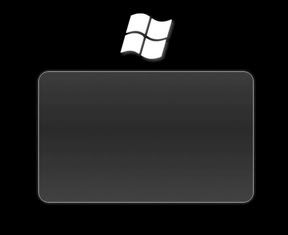
the complete alpha channel will look like this:
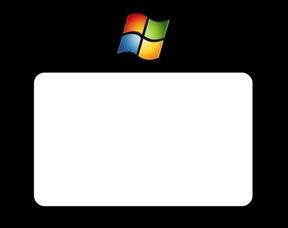
The actual image will look this way.
13. Finally, save the image bitmap_128  as 32-bit bitmap.
Last tip, if you would like your centerpanel images to have shadows, I suggest you use black as background color of your bitmap_128. However, if shadows are not included, then any background color can do. I hope this simple tutorial helped.
//The Sphynx//